 |
There are many images on this one page, please give your |
 |
 |
 |
 |
 |
 |
 |
 |
 |
 |
![]() Introduction
Introduction
The Purpose of this Mini-World Prototype
The game as outlined in the original design document will be as big and varied as we can get it. Much of the core ideas have already been established however it would be mad to proceed at this point with focusing the project on building The Game Proper from the start. Instead we spend time on a tiny small scale representation of what the "Game Proper" will feature. We will get this Mini-World functioning as best as possible with as many of the features and mechanics as possible and only when we are comfortable with what has been implemented do we then start to build the real game world.
This Mini-World project is also the perfect test and exercise on how we can develop a good project synchronisation system, and in general how well we can work together as a team.
This Mini-World when complete (or at a medium to advanced level of development) can also be used to launch the project into public exposure. It may be a case that after we complete the Mini-World we may be thrilled with it ourselves, but putting it into the public eye at that stage will give us some early indication if people are at all interested in it and whether or not going ahead with The Game Proper is worth the work and time.
Exposing the project in public at this Mini-World prototype phase might also help to expose any potential legal issues before we fully commit to making The Game Proper.
In other words the sooner we expose what we are doing the sooner we will know if work continues. It may very well be a case that we get 0% interest from anywhere, someone taking up some legal issue with some aspect of the game, or something else soon after its exposed so we can then perhaps rethink the whole idea based on negative feedback, or just abandon the idea altogether.
I say the sooner the better, but its also important for first exposure to have something tempting for people so this prototype really needs to be as good as we can get even if that means getting in more help.
Apart from the reasons above, creating this Mini-World has also been a test of my ability to produce something that I have honesty never tried before, a compete layout of a world (all be it a small one) that has rules, logical progression, functionalities, yet has to be interesting to navigate through with an ideal flow of gameplay, and have all things work as one aesthetic.
For me this was not only about producing an environment to test mechanics and functionality, but it was also an exercise in producing something that the "player" will enjoy playing.
This is all very new to me, and because of the nature of the game I had no direct reference (asides from the basic inspirations of other games mentioned in the original design doc) on how a world can be laid out combining layers of puzzle elements, linearity of progression yet keeping a degree of open exploration, and the whole logic of the marriage between those two.
This factor above all determined how the rest of game would be right down to its overall aesthetic and layout and was the biggest challenge for me to figure as one coherent world.
Because this is all new to me, it's likely I have made some bad choices or mistakes in the layout (in particular with Elevator types and placement in context to the open-world nature of the game) that would need to be fixed, but for the most part it would require minor alterations to the Mini-World.
Only game play testing with basic/ to advanced levels of implementation of functionality will be able to determine whether or not the general layout of gameplay works.
After getting people to test play the Mini-World when its compete , then I will know if I can cut the mustard with level/world design/layout.
If it's a case that people really like the mechanics and general idea of the game but deplore the level design, either its too hard, too easy, too confusing, then we can look at getting in someone with some specific level / puzzle design experience and see what they can make of things so they can either advise me or directly work on The Game Proper project.
No matter how good the mechanics and look of the game it all means nothing if there is no potent game play, and that game play for the most part in this type of game pivots around its level design/layout, how interesting, challenging and varied it is.
The Purpose of this Document.
This document is intended to break down how each function works, how the player progresses through the Mini-World, also explaining how simple or advanced we can make the implementations. I will also talk about how ideally everything should be presented and other possible features.
There are some areas related to this Mini-World prototype I have not detailed much such as game GUI, Sound Effects, Music Track, Presentation Screens, Post Effect & Filtering, Player/NPC behavior/death animation sequences and other areas, However this document should cover pretty much all the core aspects in detail.
As I mentioned, I am new to game design in general but I have also never attempted to produce such a detailed and thorough document either. I have tried my best to make it as clear and easy to understand as possible even tho some of the aspects of this were tricky to explain in particular the sections on player progression through the Mini-World.
| IMORTANT NOTE: Every Image on this page is clickable so you can see a much higher resolution version of it, This might be particularly prevalent in some sections where I have tried to save on page space by using thumbnail images that may have important visual details only seen clearly at the image's full size. Any Image Thumbnail with Red border is video content. You can click the full size button to see them bigger once its playing. Every image used are not representative of the actual look of he final game , they are conceptual images made with MagicaVoxel and in some cases using post effects in graphics software. To get a better idea of what the final game look might be please read this short document: Subsequent Document: Matching Concept Images with Unity Shader/Filters |
The Preliminary Documents
This document only covers information related to the "Mini-World Prototype" and is only a partial document in context to the game idea as a whole (Game Proper). Many other aspects to the game idea have been initially outlined on previous documents. I would highly advise anyone about to read this document that they read these theses preliminary documents first. Reading this document will make ALOT more contextual sense when put against the background of the foundations of the game idea as a whole. Although many of the "possible" features outlined on the preliminary docs have been omitted in this Mini-World Prototype they may still have relevance to The Game Proper.
Original Document
Additional Document: Matching Concept Images with Unity Shader/Filters
NEW!! Additional Document: First Batch of Conceptual Video Demonstrations Simulating Gameplay
Terminology To Avoid Confusion
Some sort of made up terms relating specifically to this document / idea.
Cube Resolution/Grid - This is smallest increment resolution of how things are built , the atom so to speak
5x5 Resolution/Grid - This will refer to the player cube, NPCs, the navigable areas of the world and so on.
Block - Any part of a structure or detail in the world that the player can climb or not climb in the case of it being to high
Square - The surface of a block (Top/Sides)
Walkway(s) - Certain confined areas the player can move on, usually referring to the elevated walkways.
Item Cube - Refers to 1x1x1 cubes that are collectable and droppable
Notch - A hint/clue on blocks/squares/other details that are used generally throughout the world but may have slightly different aesthetics depending on context/area of the world.
Symbol - Any detail on a square or element in the world that pertains to some or other mechanic or functionality.
Key Square - The color pickup mechanic
Switch Square - The color pickup mechanic or standard switches (one instance of a standard switch in the Mini-World)
Elevator/Bridge Blocks - Blocks that in general bridge a gap on a path or raise / lower to the player cube to other areas.
Slot - A 1x1x1 hole that holds items, such as the players cube, and the pillars in the HUB area)
Section(s) - The 120x120x126 sections built in MagicaVoxel of which there will be 9 in the Mini-World
The Mini-World / Prototype - Refers to the Mini-World prototype only.
The Game Proper - Refers to active development of the project in context to the actual game and not this small scale/limited prototype.
Sub-Mechanics - Complimentary mechanic that are not a core mechanic, such as different types of hazard squares, items types.. etc.
Player Progression - Refers to the sequences of how the player moves through the world , the sequences of introductions to functions / hints, the sequence of tasks and management of inventory over time.
HUB - The area at the start of the game where the player deposits their Item Cubes
How The Mini-World Works In Comparison to the Original Design Document
What makes this Mini-World document different then the original game design document is that I have taken some of the features from the original design document, refined them and built a working conceptual small scale world, with an overriding goal and a degree of logical progression through while keeping it open for exploration. However much of the sub-mechanics as outlined in the original design document have either been watered down so much or not used at all and its very likely The Game Proper may not use most of sub mechanics suggested in the original design doc.
Sub-Mechanics / Features From Original Design Doc Omitted in this Mini-World prototype (and likely The Game Proper) include:
- Function/Hazard squares:
Only 3 types of function/hazard squares are being used, "Standard Switches", and "Controllers" In fact there are only 3 instances of these types of squares as will be explained as I break down each section.
- The Various Types of Items
There is only one item being used here, the pink cubes that can be thought of as the "Quest Items" as explained in the original document And quite honestly I think The Game Proper could be based entirely on this system of one item. However I would like to keep that open and might like to introduce one or two other item types in The Game Proper, but the need for so many items and powerups/abilities as outlined in the original document is I think after dwelling and working with it for so many weeks it's overkill at best.
- Health System:
There is no health system, you just die and respawn at a corresponding respawn point and that's it, I really don't think there is any need for a health system, even for The Game Proper, it over complicates something that ideally should be minimal and potent.
- Camera Rotation/Player Viewablity:
I have spent ALOT of time ensuring this Mini-World can be played exclusively in one camera angle. The means that much of the suggestions outlined in the original document can be thrown right out the window, including the ability for the player to switch camera angle/view, the outline overlay of the player's cube when they are behind/inside areas, the need for an elaborate system where layers fade so the player can see inside or behind.. etc .. all that.. no need for it anymore, and that goes for The Game Proper too.
There will however be some instances where the camera rotates around outside of active gameplay as will be explained further on in this document.
- Specific Puzzle Areas
One thing that may have become obvious by now and that I have not really mentioned is that you will notice I have pretty much abandoned the idea of having these specific puzzle areas, instead integrating the color mechanic into the world as a whole. I feel this will help make gameplay on the whole more interesting/challenging while exploring around and helps to have a better flow of progression. There are areas with puzzles in the Mini-World but not the specific type as outlined throughout the original doc that feature such things as roll count or a timer.. etc
In short the puzzle elements to the game are now integrated into the game world as puzzle light challenges rather than the two distinct areas/mode (Exploration World / Puzzle Areas) idea I had originally.
Although I have chosen to minimize the functionality and feature set of the Mini-World as much as I possibly can compared to what was suggested in the original document, there are features from that document that I would still much like to try implement into The Game Proper, but for the most part the features mentioned above will no longer be needed.
This Mini-World prototype features puzzle ares and detailing that may not be as densely packed in the Game Proper. I have tried to pack as much into this small prototype environment mostly for testing purposes.
_________________________________________________________________________________________________
![]() Rules, Mechanics and Functionality
Rules, Mechanics and Functionality
The Global Rules To The Mini-World
I was really hoping not to have to create new diagrams on how the cube should navigate around the world, so I wont, especially since I have outlined this pretty much already. However just to refine how the rules of movement work here is a breakdown of the ones that are already obvious and other that may not be as obvious.
Control
- Player uses a 4 key/joypad stick control (ASWD / Arrow keys) for movement
- Player uses the one and only action key/button to trigger certain functions depending on context.
Movement of the Player's Cube (Mechanics Explained in Original Document)
- Player rolls in any direction to move
- Player can roll one square at a time by gentle key/button pressing or hold down in any direct to roll indefinitely at maximum speed.
- Player can dynamically balance their cube, pull back from wrong rolls at the last moment.
- Player can climb blocks that are 5 cubes in height (cube res)
- Player can not climb blocks higher then 6 (cube res) (there are no instance of a block being lower then 5 in the Mini-World)
- Player can drop down from a block that is 5 cube res in height (see mechanics section of original design doc to see how this happens)
- Player can wade through water (water 3 cubes in height) and will result in slower movement
Ice Squares / Blocks
- Player slides one block after rolling onto an ice block, unless the following occurs..
- Player wont slide on rolling on to an ice block from dropping down from or climbing up to
an ice block
- Player wont slide if there is a regular non-ice square after the ice square they are about to roll onto.
- Player wont slide if they are on ice while wading in water.
Death Conditions
- On dropping from a height that is 6 cube res or more in height
- On contact with Certain NPC's
- On submerging underwater for a certain period of time.
Re-Spawning Conditions
- Player has to activate respawning points by simply rolling over them.
- On re-spawning the player will re-spawn at the last spawn point they activated.
- A players inventory state is saved when activated a spawning point.
- The last spawn point a player activated is reset when they activate a new spawn point, meaning they have activate that last spawn point again if they enter that area again even tho they have already activate it before.
Item Management (Some Aspects Explained in Original Document)
- Player can collect Pink Item Cubes, and hold a maximum of 6 at any one time
- Player has to orientate their cube to pick up Item Cubes with an empty slot
- Any occupied slot on the players cube will color the inside face of the cube.
- Player can drop Item Cubes by pressing a Key/button
- Player has to orientate their item face down in order to drop it (or to the side in the case of the Hub area on section 5)
- Dropped Item Cubes remain persistent in the Mini-World at all times
- Player can not drop Item Cubes while wading through or submerged in water.
- On dying the player will loose any items cubes that where collected after they activated the last spawn point
Color Key / Switch Management (Some Aspects Explained in Original Document)
- Player picks up a Key Square in much the same way as an Item Cube
- On picking up a Key Color the outside of the edge of the face it was picked up on will color the same color as the Key
- Player cannot drop a color like they can items.
- Player can hold 2 Keys at once
- If collecting 2 Keys then these Keys can only be collected on the opposite side.
- Each Key & Its corresponding Switch will have a unique color as to avoid confusion if they are the same color when carrying 2 so the player wont loose track of which Key corresponds to which switch
- After picking up a Key square the square it was picked up from becomes a normal color (ie the color has been transferred to the player)
- After solving a puzzle by rolling over its switch square the switch square will also return to a normal square.
- The Key squares on already solved puzzles will only repair if the player dies after solving it but before activating a spawn point.
- If the player holds a Key but walks too far away from the general area of the puzzle it might be a case that the color gets zapped away from the player and back to the square they originally picked it up on. This is to avoid situations where the player might pick up a color get distracted and walk far away from its corresponding switch, and end up in an area that requires more color pickups.
| (NOTE: in all the screenshots I forgot to make all the color Keys with their corresponding switches unique colors apart from the ice areas where i made them pink because the green ones didn't stand out very well on the bright ice blocks, so all every Key/switch will have it's own color.) |
Dialog trigger and engagement
- In most cases a dialog prompt will be triggered by predefined proximity or in some cases if the player is one square away from an NPC
- Player can roll away from a dialog prompt without engaging it and it will disappear
- Player clicks key/button to enter into dialog with an NPC (when a dialog prompt has been presented)
- Player clicks key/button to scroll through pages of dialog
- Player uses movement keys/buttons + key/button in cases of multiple dialog choices.
Sound Effects
Sound effects will indicated to the player wrong moves, such as a sound effect to indicated that you are trying to roll against a wall/dead end in areas unseen to the player, also possibly sound effect to indicate the player is about to drop down a height too high (as such in cases of 6 cube heights that are not immediately easy to make out). Other possible sound effect might be applied when picking up items, wading through or falling into water, moving elements in the world, NPC's and so on. The sounds can be developed as we work on the Mini-World.
| IMORTANT NOTE: If any of these prove to be difficult to implement in terms of code we can perhaps leave some of the less important ones for now. If needs be we can get some help on getting it implemented. |
____________________________________________________________________________________________________
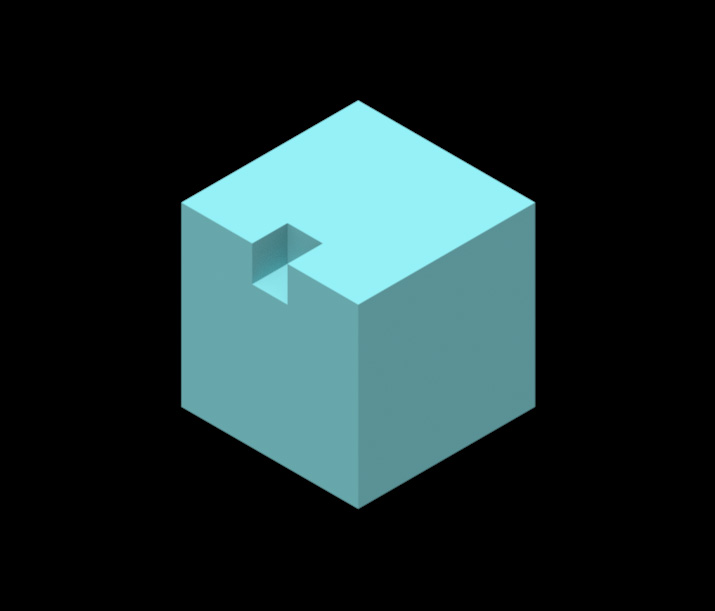
I wanted a simple and effective system of hints that are easy to learn and read but that careless/unobservant gameplay would result in punishment. I wanted a global aesthetic but at the same time wanted variety so didn't want to end up with one aesthetic for every instance of a hint. My final idea is what I call in context to the style of this game "Notch detailing" on blocks or structures in the world in general. By that I mean any where the player sees something that is carved out of a block they will (after some play) intuitively know it's a hint of some kind or another. As apposed to "painted detailing" on blocks/structures which most likely indicates a function. By using this idea I now have a global hint indication that I can vary around the game.
The Mini-World takes this global "Notch" hint concept and uses it in 4 different aesthetic ways as shown below, however The Game Proper can use this simple Notch system in so many other ways.
 |
 |
 |
 |
| In it's basic form here is the hint for the Ice blocks. I am using Notches on its edge to give the impression of cracks, however this aesthetic also is a hint system. so any time the player sees a Notch on one of it's edges it means attempting to roll off that side will result in a death. | In addition to the edge Notches, there will be Notches at the center of Ice Blocks, these Notches will indicate to the player there is an item on one of the blocks either to it's sides or corners. The edge Notch and center Notch hints can be combined to create some interesting challenges based on the players careful observations. | As a simple example here we can see a small area of Ice blocks. On observation the player knows there is an Item cube somewhere around that block with the center Notch. Assuming they are starting from the lower block at the front they have two ways to try get to it, either NORTH or WEST. | The area from a slightly offset top down perspective we can see where the Item cube is and how taking the NORTH route would have ultimately ended up in the player falling to their death. However looking again at the previous image you can clearly see which way is the wrong way by the edge Notches. |
 |
 |
 |
| Another type of hint system, pretty much the same as the Ice Blocks but using different aesthetic. They use a groove on the face rather then edge Notches, but its the same idea in as far as any side the there is a groove that means bad things for the player. | Here we have a small simple example of an observation puzzle much like the Ice blocks. There is an Item cube to be found. Assuming the player is starting from the lower block to the front of view its rather obvious (but easy to make mistakes) which way will result in a death. | The area from a slightly offset top down perspective we can see where the Item cube is and how the player taking the NORTH route would have ultimately ended in death. |
 |
 |
 |
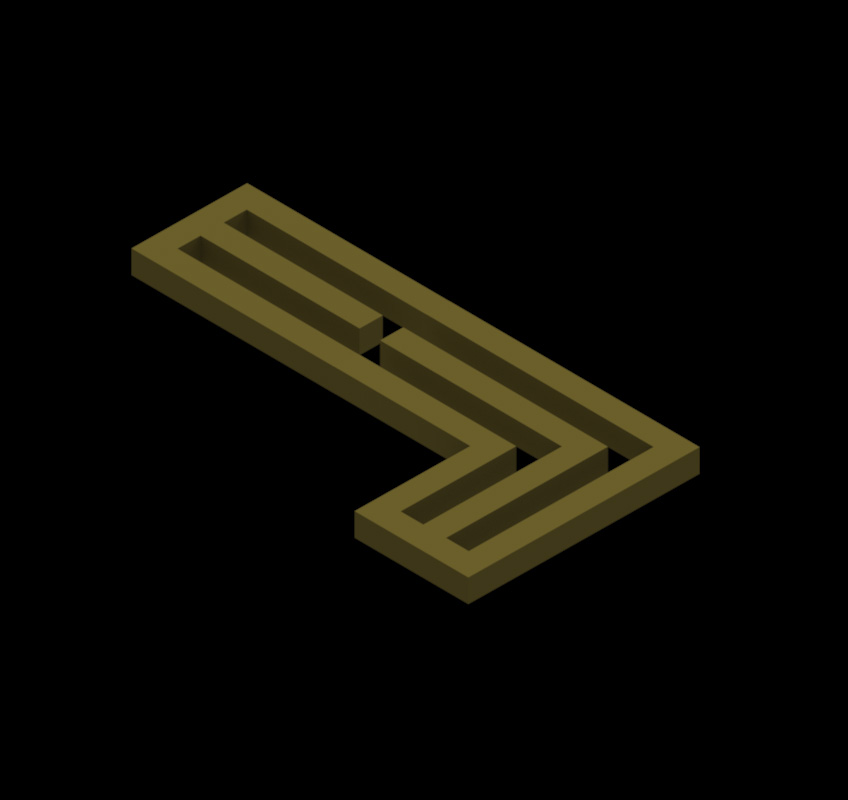
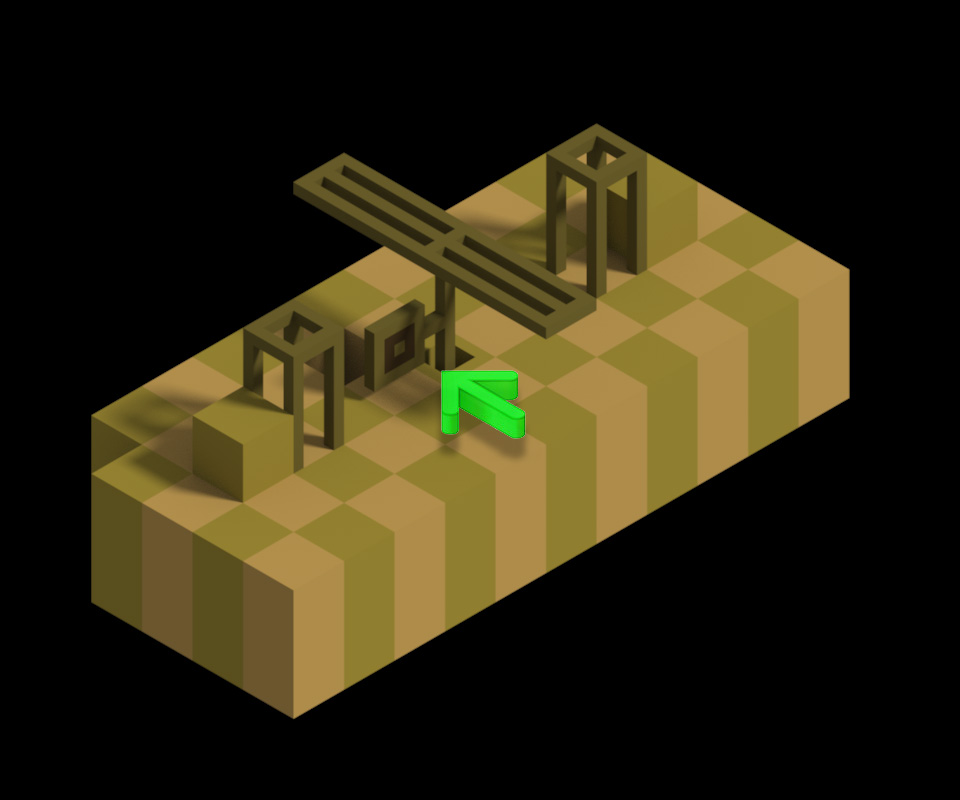
| Assuming the player stars from the square to the front of this image one might assume they could roll once to the NORTH and 3 rolls to the WEST. However on careful observation they might notice a Notch in the center rung of this type of walkway. This will indicated to the player, much like any other Notch hint, that there is danger. | looking at this from a pure top down perspective we can now see in fact the area where the player thought they could roll is in fact not even connected to the walkway they are on. | And looking at that same situation from an offset horizontal perspective we can see that piece is also lower then the walkway they are on. These specific optical illusion features will be kept to a bare minimum in context to integration into the world as a whole, but there will be specific areas where these apply more so then others and the player will know they are in these special areas by NPC interaction. See the the section on "The Optical Illusion Factor" for further details. |
 |
 |
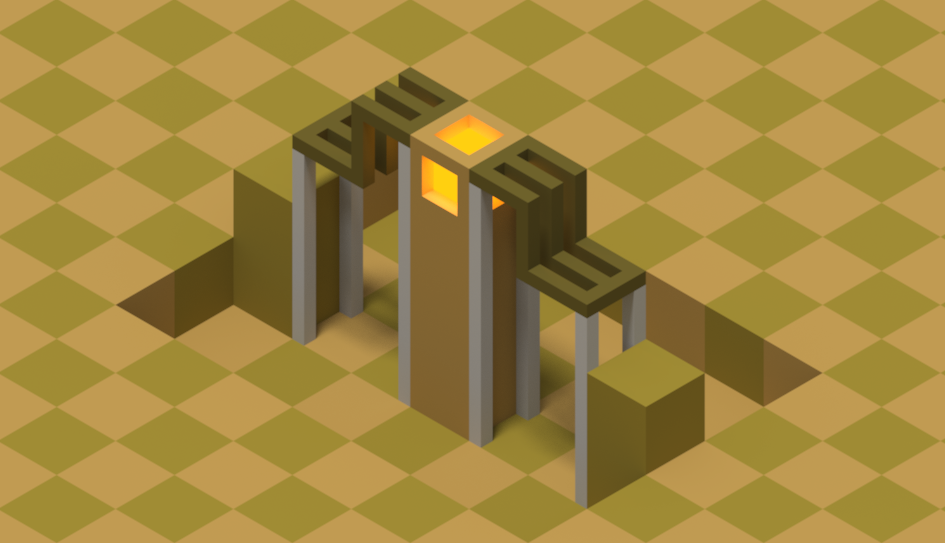
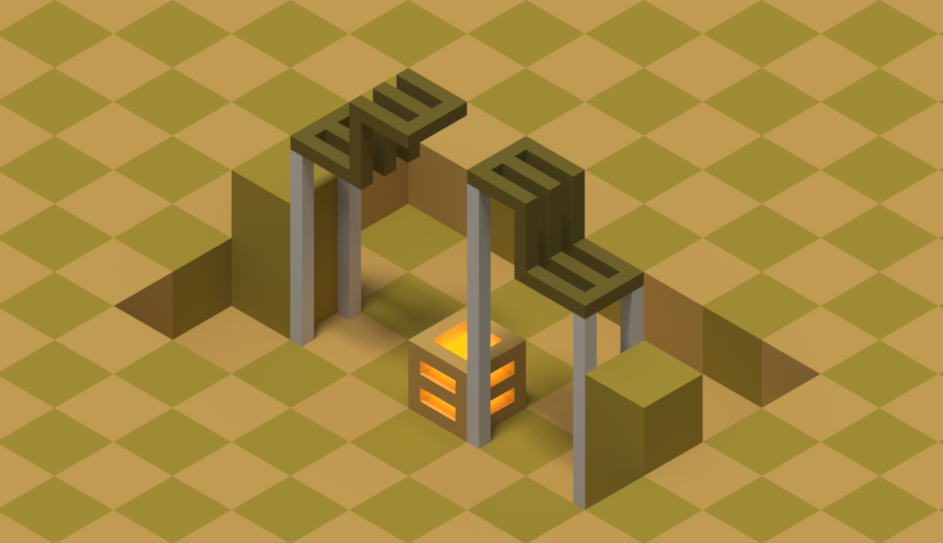
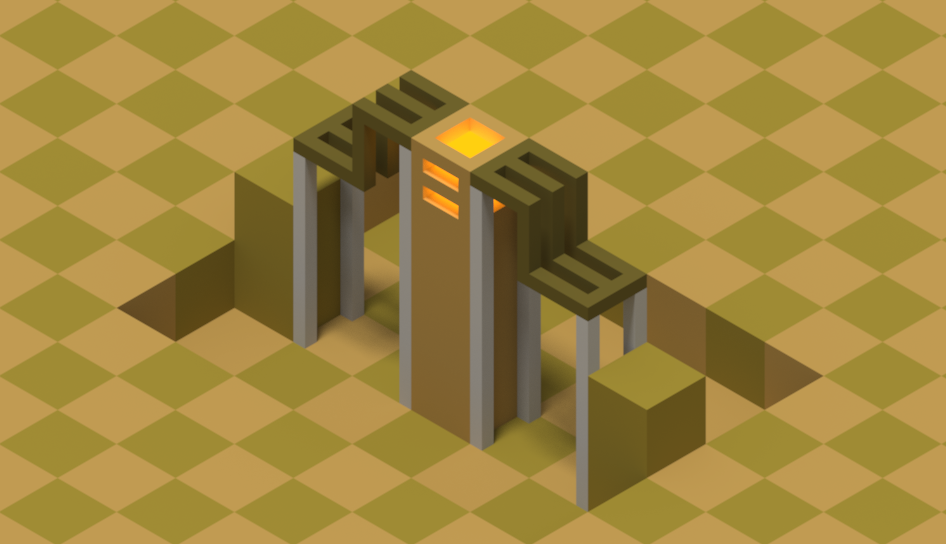
| This is yet another instance of curious Notches appearing in the world. The player can probably assume since there is a doorway here they can roll into it and perhaps there is something there. They might then assume to count the squares on the top of the structure as to avoid any possible drop at the end, however in this instances the 6 Notches to the side are telling the player there are 6 squares that are defiantly safe to roll on. | Looking at the back we can see that 6 squares would bring the player outside of the structure and onto a platform to collect a hidden Item Cube. Any more rolls extra and the player would fall off and die. In the Mini-World there are 2 instances of using this type of hint (Section:6) however in the images that feature section 6 I forgot to make the hints Notches rather then the purple color. |
In the game proper as the player progresses further into the game, these notches might have a reversed meaning. In the examples above generally speaking where there is a notch it means danger, however in other scenarios this will be switched around so the absence of notches will mean danger. Inverting their meaning will keep the player on their toes and punish careless/unobservant players. Whether or not the notch hints have negative or positive meaning the player will always know their meaning by simply observing the area before navigating it.
Notches on structures and details in the world wont always necessarily have any relation to a hint, they may just be for decoration, but when they are used as hints it will be obvious to the player. In general notches can be thought of as a general loose type of code in the game as to give a sense of mystery.
____________________________________________________________________________________________________
![]() Re-spawning
Re-spawning
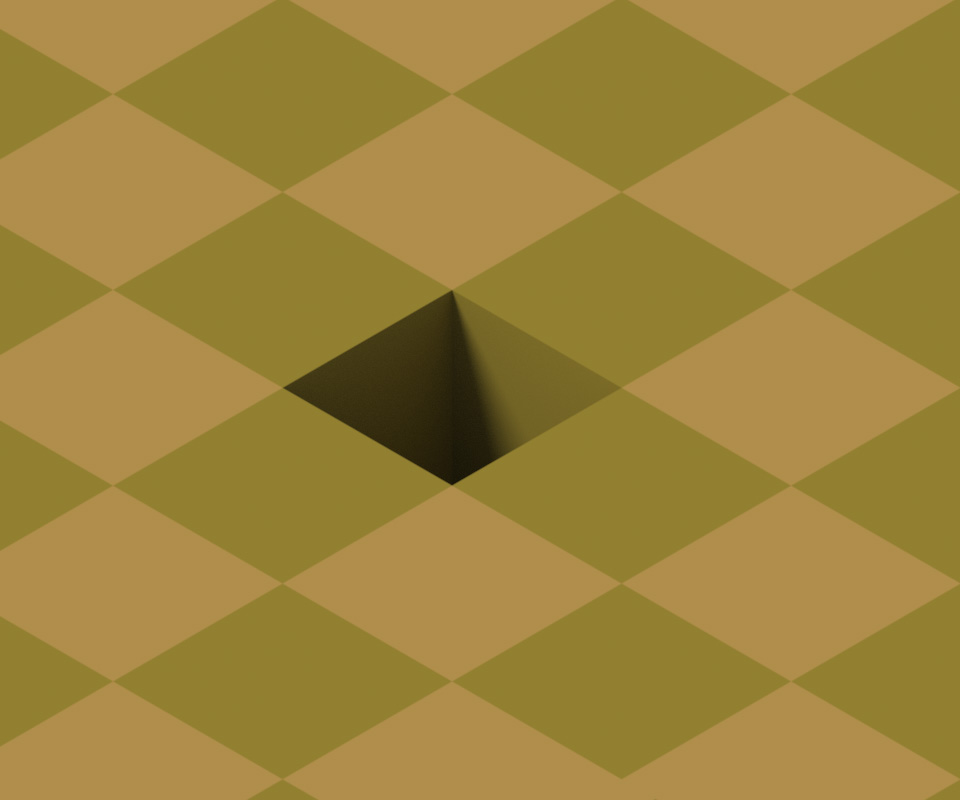
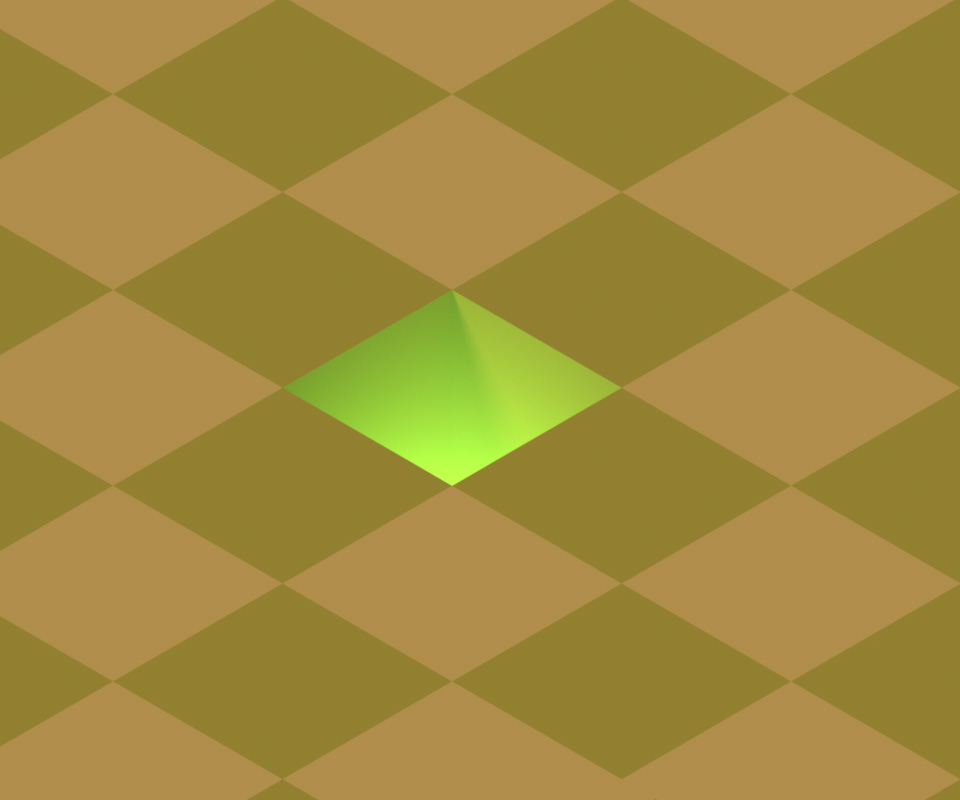
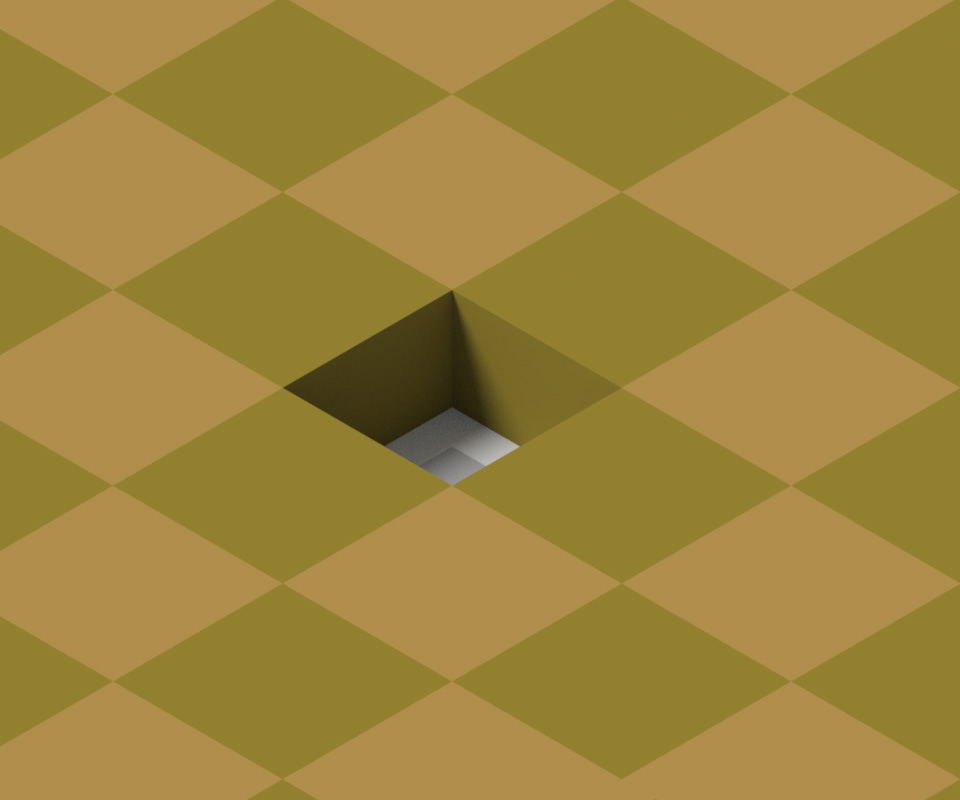
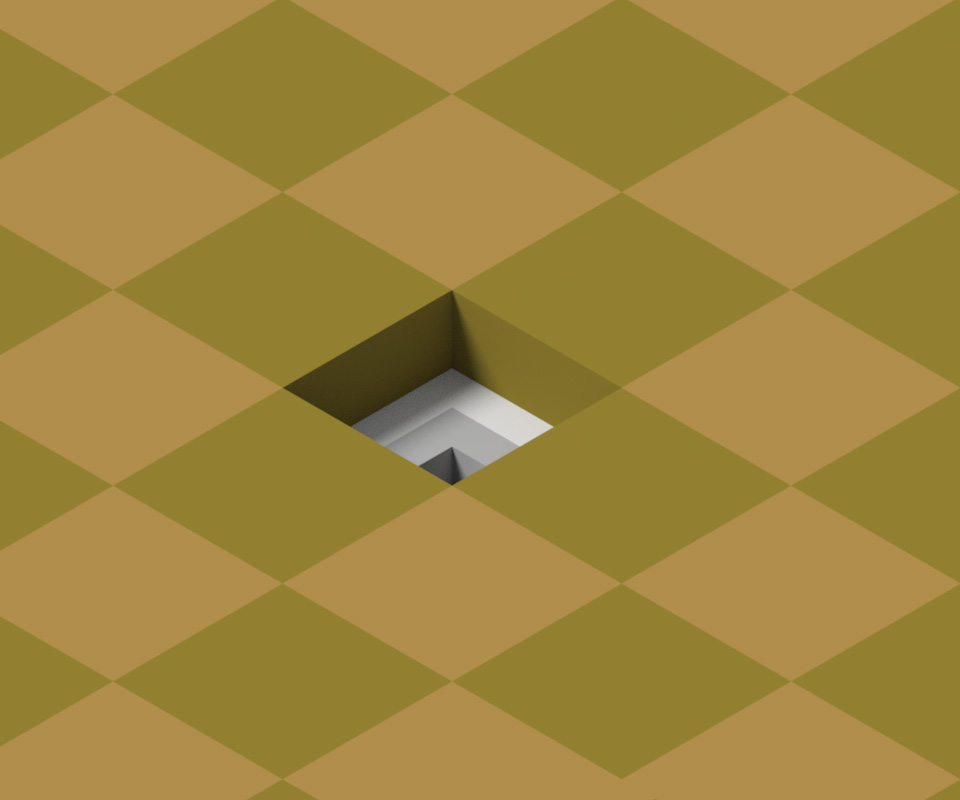
Ideally after dying there will be a nice re-spawning sequence, the camera will pan away from where the player just died, then settle on the last spawn point activated by the player, zoom in a bit and the following sequence will occur:
 |
 |
 |
 |
 |
 |
 |
 |
 |
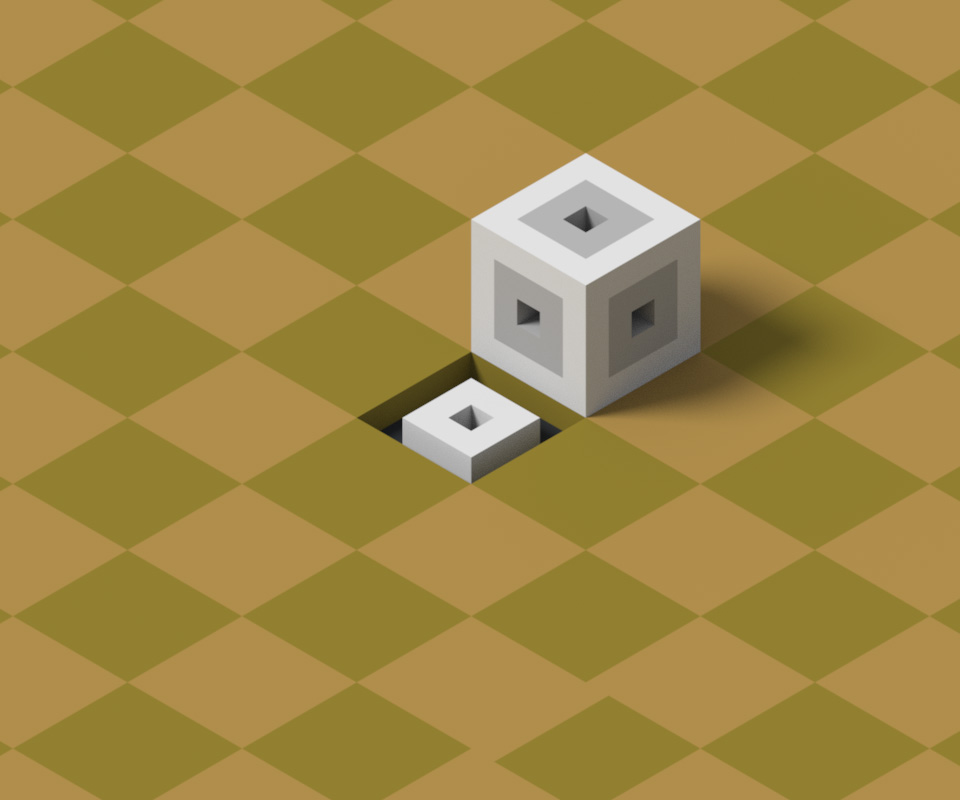 |
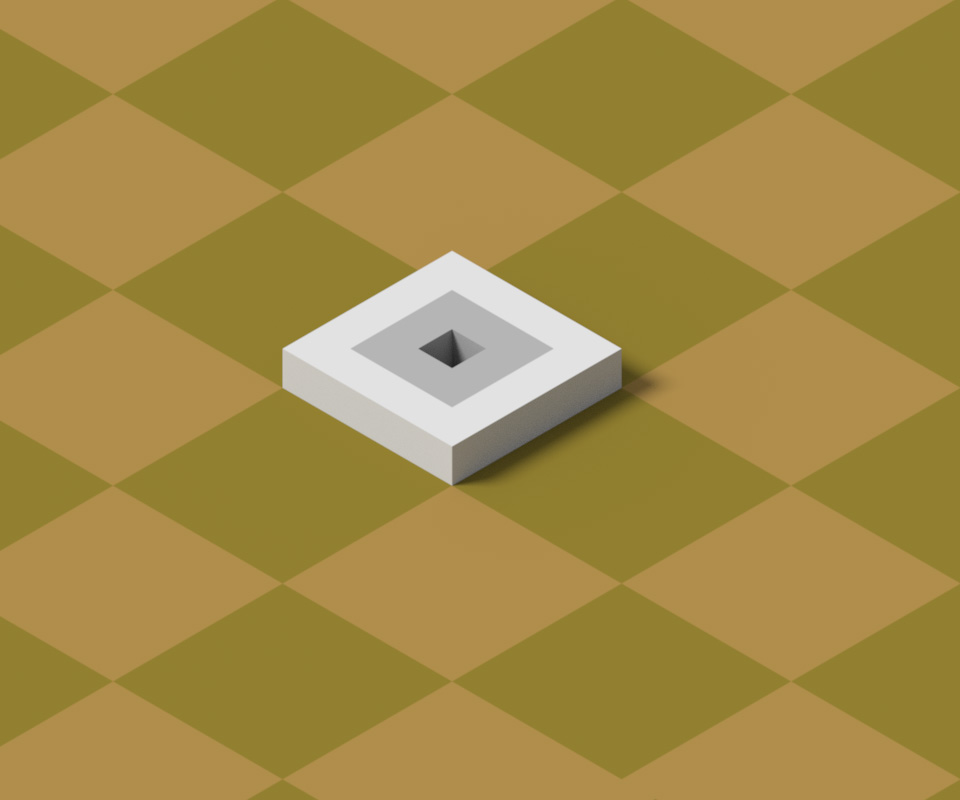
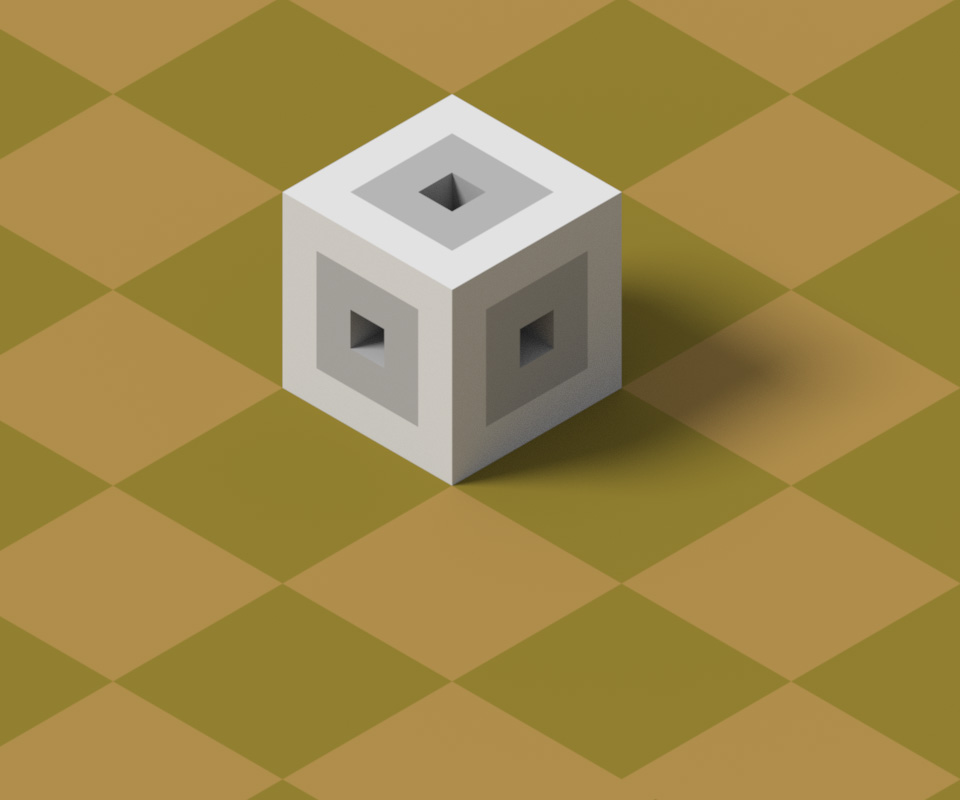
The respawn point starts to drop into the ground, a flash of light to indicate something has happened, then the player cube rises out of the ground and rolls off the spawn point to continue their adventure.
| IMORTANT NOTE: If this is too difficult to implement in terms of code we can perhaps leave it for now so the cube just re-appears. This would not be a priority for the Mini-World so can be left toward the end of the Mini-World prototypes development, If needs be we can get some help on getting it implemented, but for now don't worry about, just have the idea sitting in your head :) |
____________________________________________________________________________________________________
![]() NPC & Player Dialog , Reactive Animations & Audio Speech
NPC & Player Dialog , Reactive Animations & Audio Speech
Along with the hints as mentioned, NPC's can also deliver pieces of valuable information to the player in terms of how to play the game, and can also be used "obviously" to deliver a minimal story to the game, or some individual back stories to each NPC.
I needed to think of some way of delivering dialog text/hints and I really wanted it be somewhat unique, somehow fit it into the world, but have it decent looking , clear to read , easy and flexible to implement and modify.
After many ideas I settled on the idea of having a glassy slate style box set into a 45 or flipped to -45 (both will be used).
There wont be a lot of room to fit in a lot of text at the same time, but just like JRPG games, the player can click to see more text if it's a long piece of dialog. (perhaps when switching to the next page of text in a dialog the dialog box will rotate/flip quickly around to reveal the next bit of text)
 |
 |
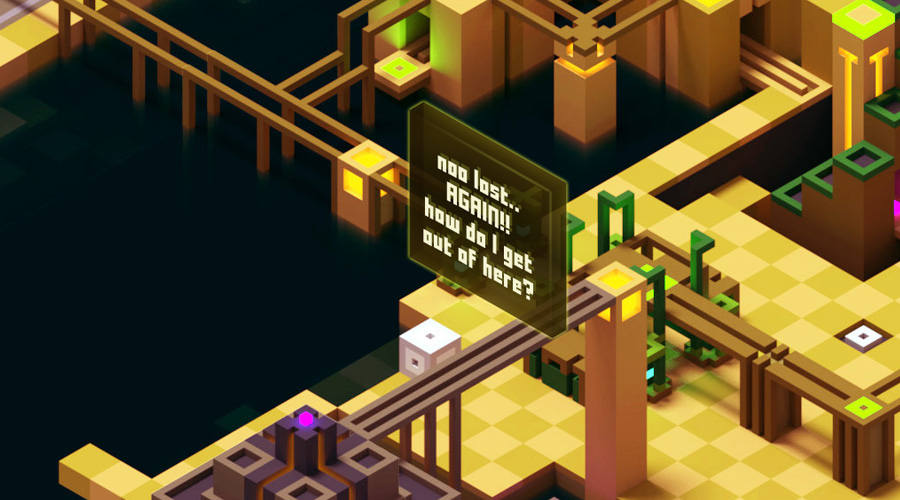 |
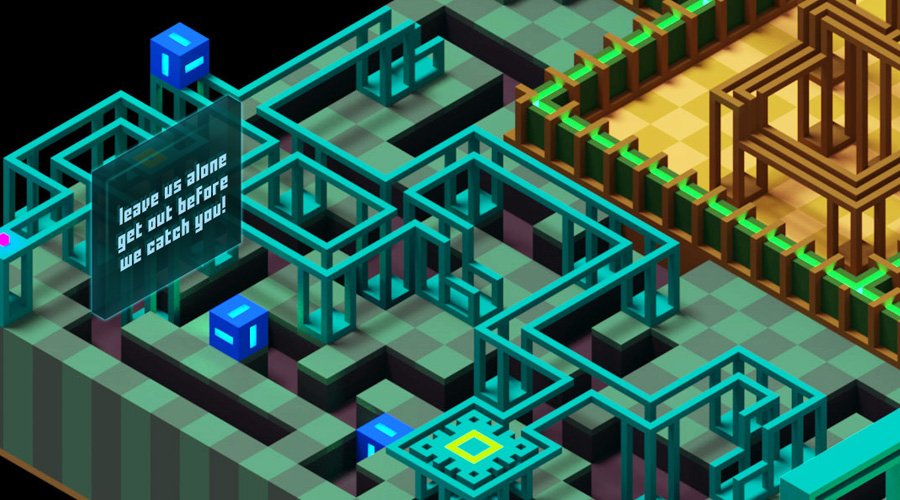
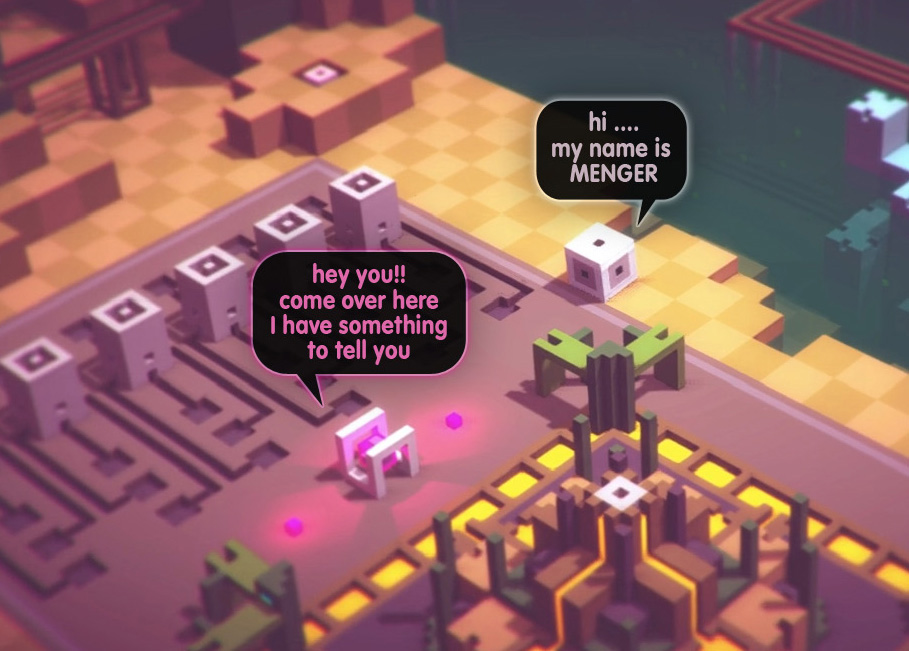
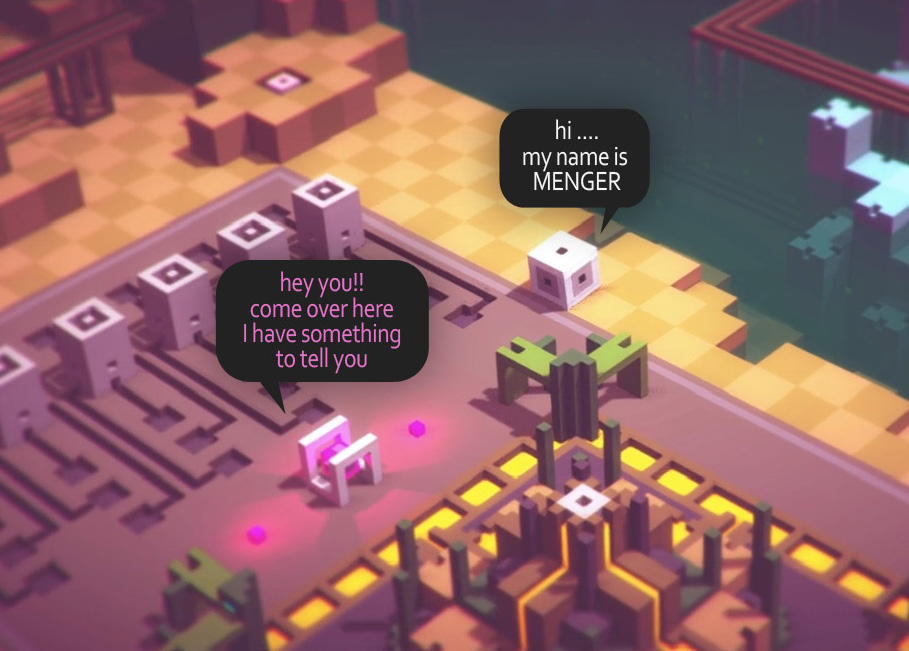
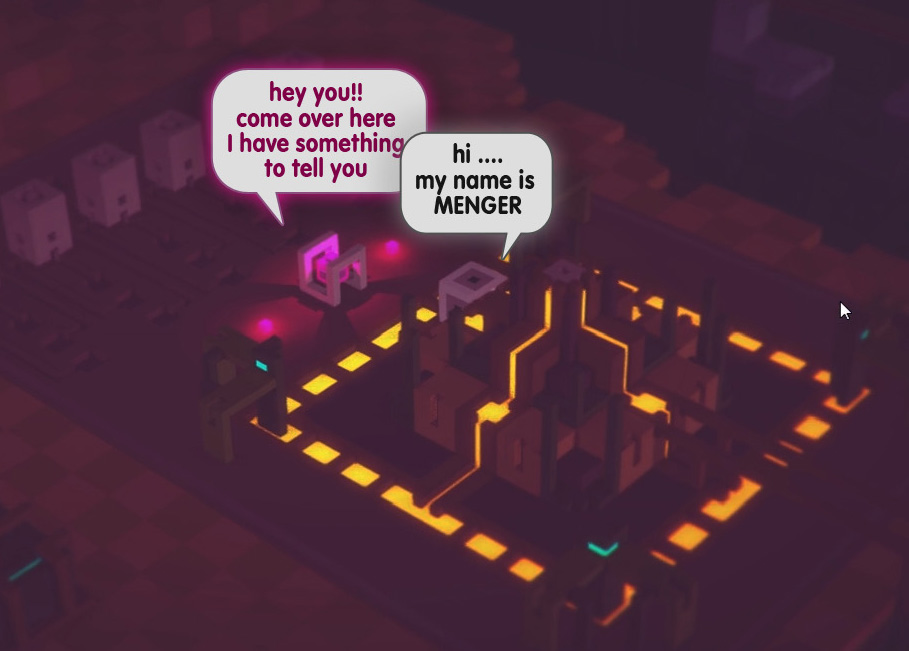
| Dialog color theme for the Hub NPC | Color theme for the Angry Triplets | Example showing rotated dialog box. |
The text is slightly made to look like its embedded into the glassy slate, and each dialog box and text, depending on the color of the NPC, will have a different hue to emphasise different dialogs from different NPC's. The fonts used in this example may not be the style use in the prototype or game proper.
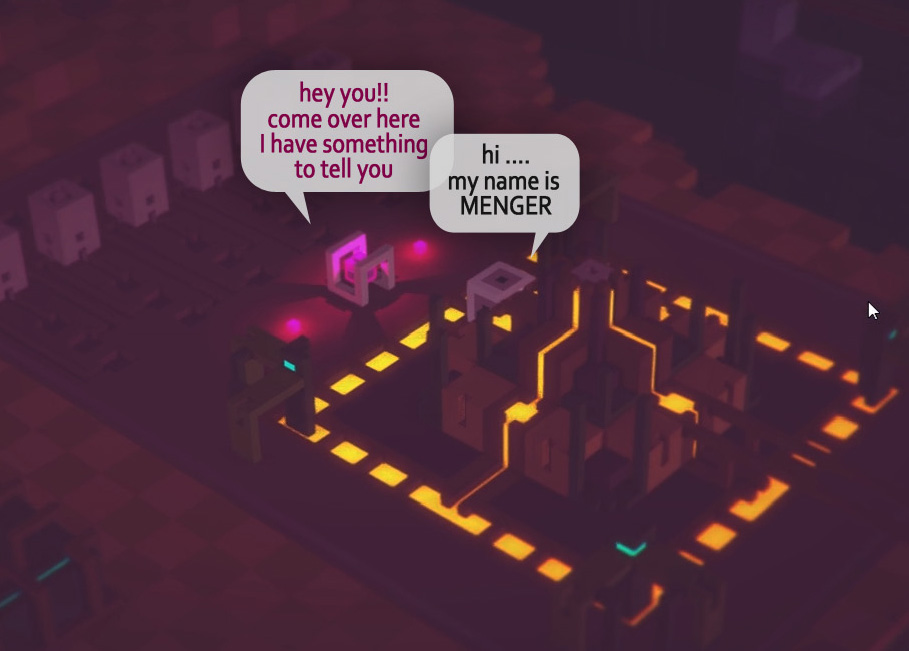
As shown in the 3rd image above they can have 2 orientations, not just for variety but for function too in as far as if there are 2 dialog boxes on screen at the same time for example the Player cube is talking to an NPC then both orientations are used, or in the case of talking to an NPC from approaching it from another side (See dialog hint on the next section as an example)
These dialog boxes ideally should slowly bob up and down very slightly when they are active on screen as to give the impression they are floating GUI elements as opposed to objects on the world.
![]() Some Alternate Styles of Dialog Box Designs
Some Alternate Styles of Dialog Box Designs
 |
 |
 |
 |
Reactive / Emotional Animated Sequences
NPC's in the world wont just be standing around still. Many of them will roll around on certain pre-defined paths, back and forth like a sequence of patrolling or daily activity. Along with their movement about the world, these NPC's will also have certain behaviors in the form of pre-defined animated reaction sequences.
These reaction animations will take most prominence during dialog sessions with the player, however many of the animations could be applied to other instances of game play such as an NPC trying to get the player's attention from a distance, showing approval or disapproval at a given task.. etc etc
My challenge was to create examples of these reactions while keeping the cubic nature of the NPC's absolutely rigid. At all costs I wanted to avoid any squash/stretch/twist in the geometry of the cubes to force a look of natural movement and end up with them cartoony. Part of the aesthetic of this game is in its uniformity of right angles/solidity.. etc, and to see an NPC stretch/twist to convey some reaction would, I feel conflict with that aesthetic. So it was a bit tricky making a primitive cube seem like its alive, with certain basic emotional reactions.
The other challenge was because these sequences are "in place animations" it means that the sequences would have to start on the NPC's grid square and end the sequence on the same square, so doing things like jumps/flips was tricky to make look right because these actions would have a tendency to make the cube drift away from its grid in real world scenario, so I have tried to make these sequences as physically plausible as possible based on this and the rigidity.
These examples are not in Engine animations. They could be improved since I was not using any physics/gravity here, its all hand tweened animation.
There are 6 sequences here and I feel more then enough to apply throughout the Mini-World prototype, however the game proper could feature many more of these.
Press the full screen button if the thumbnail sizes are too small.
| Small Bunny Hop | 4 Corner Rocking | High Jump |
| Flip Over | Rocking | Pirouette |
These 6 sequences alone, when strung together in any one dialog session with the player could be ideal to give these NPC's an extra spark of life.
These types of sequences can not only be applied to NPC's but also the players cube during dialog, or in other situation such as if the player has collected an item cube they might do a flip or jump for joy.
These 6 sequences could also be rotated/mirrored in any which ways for variety, so the player is not always seeing the same orientation of moments on the one recurring reaction animation sequence.
Other Animated Sequences
There will be other animated sequences not specifically related to an emotional reaction, such as the player dying in certain ways, or using a teleport warp square as shown in the example video below.
NPC Speech Sounds
Along with the dialog GUI each NPC will have it's own gibberish sounds when engaged in dialog. Each NPC will have their own unique sounding voice pre-generated using synthesizers. Here are some examples of the sort of synthesizer sounds for NPC speech, not entirely happy with them but they are just experiments/examples. NOTE: These examples use heavy delay/echo which will not feature on the actual speech sounds.
| VOICE 1 | VOICE 2 | VOICE 3 | VOICE 4 | VOICE 5 | VOICE 6 | VOICE 7 | VOICE 8 |
NPC Language
To add to the game aesthetic even more there could be a system of symbols in the game rather then using text. This could be tried out on the mini-world prototype. I have covered the general idea of this symbol language on the original document.
____________________________________________________________________________________________________
![]() The Optical Illusion Factor
The Optical Illusion Factor
As is obvious by the nature of the isometric perspective of the game it often creates situations where something looks like its in a certain location but when viewed at another angle it's in another location. For the most part I wanted to avoid theses instances throughout the world and only use this "optical illusion factor" very very sparingly so the player has well defined rules to navigate the world but occasionally might get caught out with little features in the world that use this optical illusion factor, but in those cases there will be hints.
That said, there will be special areas where my level design is the other way around, outside of these areas I do my best to avoid instances of it, inside these areas I do my best to make full use of it. An example of one of these areas in the Mini-World is section 3.
 |
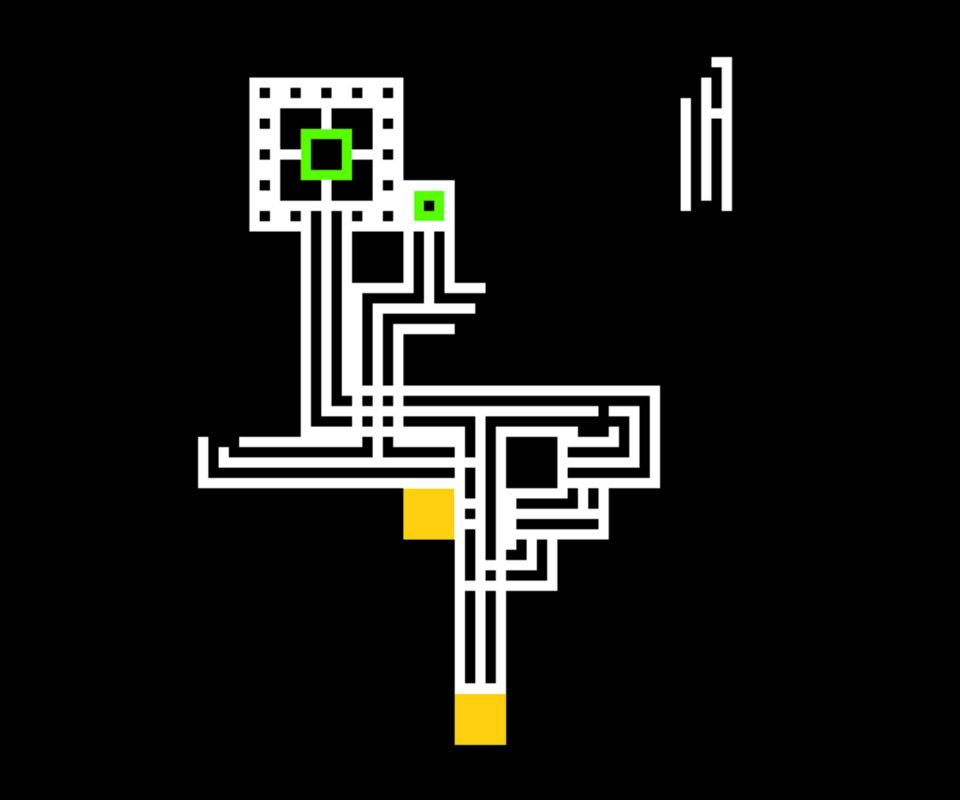 |
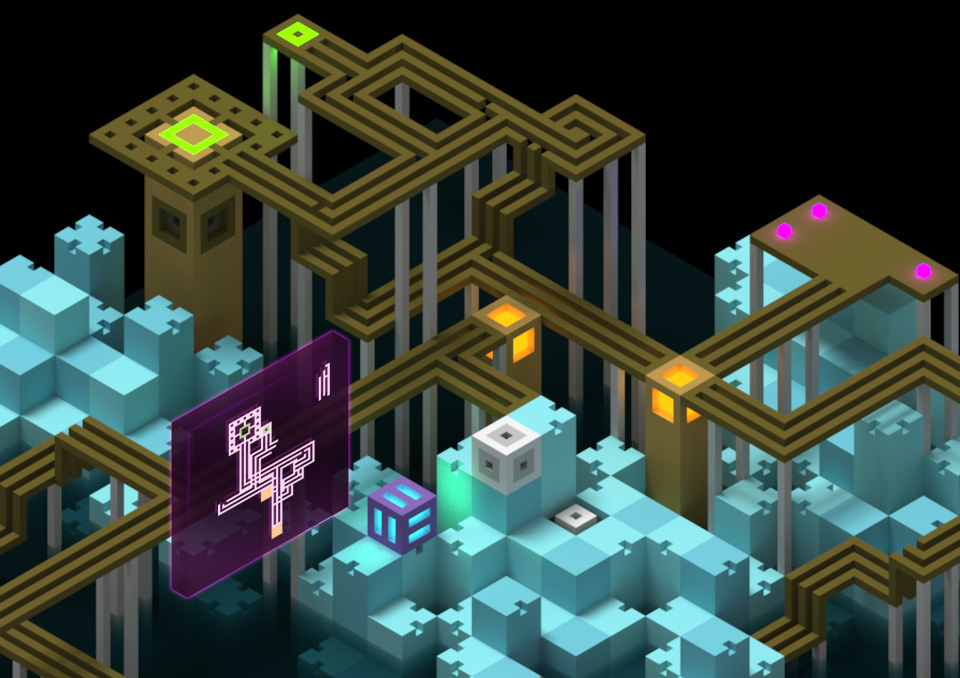
| Here is the optical illusion area on section 3, looking at it from the game's isometric view, so the area in question here are within the confines of the 2 Elevators, in this case the right Elevator is a "locked Elevator" not in its starting position, anyway the point is between these two Elevators player is within this type of optical illusion area. | Here is a simplified map of the area looking directly down on it. As you can now see things look very different than the isometric view and there are a few instances that they player would have fallen to their death if they didn't know this was an optical illusion. |
The Dialog Hint
Because this area has in effect different rules over the main world
because no roll is potentially safe due to the optical illusion, it may without hints be unfair to the player.
The player has spent time navigating non-illusionary type areas for a while and suddenly starts falling off things in these areas with no comprehension of what's going other then perhaps Notches in the rungs of the walkways which in this special instance may not be enough.
So to emphasise to the player they are about to enter these special areas there must be some dialog hint.
After thinking a bit I thought the perfect method of not only letting the player know they are entering an optical illusion area but also give them a good hint here is what i came up with:
 |
 |
| To inform the player they are entering these areas there will be an NPC (or other hints in The Game Proper in advanced stages of the game) that will show you a top down map of the area before you enter the area itself. The player can see the top down map, then look at what's ahead and if observant enough can work out the correct way. It might initially seem this would be too easy, but even looking at both at the same time its still tricky to figure out even tho the answers are all there. There is also a degree of memory challenge in that the player has to try remember that top down image in their head while navigating this area, and this memory factor would be more of a prominent game play aspect on bigger/more intricate areas. The one used in the Mini-World is a fairly simple one in terms figuring it out. |
Section 3 has two potential ways of approaching this area (before its color puzzle has been solved *gap in walkway to right of image). As explained in the dialog section previously If this area is being approached from the WEST the dialog box will orientate like this, and if the player approaches from the EAST they get the dialog facing the way its in the first image. |
The Notch Hints
 |
Along with the dialog map hint, there are also Notch hints to indicated to the player the areas of danger. Perhaps the map hint might be enough and we use Notches (based on feedback from other people testing the Mini-World) or Notch hints in these optical illusion area can be gradually used less if in advanced areas of The Game Proper. In general all types of hint don't have to be used, types of hints could be reduced as the player progresses into more advanced areas of the Game Proper. |
The Reveal / Player Reward
The Potential Issues and Compromises of these Special Optical Illusion Areas
All the concepts here are not testing in an Unity engine scene environment, so they look ideal in terms of disguising the illusion.
The game as a whole will be using post process/filtering, such as depth of field (tilt shift effect), screen space ambient occlusion, and other effects. I will also be using perhaps a specific light source angle for the world, or perhaps a changing source (day/night cycle). It is also likely there will be a slight camera perspective offset effect the further out from the camera focus point. And if using the "half table" top effect as outlined in the original design document.
All these attributes to the game that are not featured in any of these concept images may effect things to such an extent it gives away the optical illusion.
Only in engine testing can determine how effective this is and it may be a case that certain effects while the player is engaged in these areas would need to be disabled.
If it's a case that no compromise can be found to implement these areas effectively then we can look at perhaps getting in some help, or on a worst case scenario we drop the idea and I make a new section for Section 3 in the Mini-World and we don't prioritize on these areas for The Game Proper.
However I think getting a system working where these special optical illusion areas work effectively and integrate into the world as a whole would be an extremely good idea and one worth putting in the extra effort to try an achieve.
If the system as suggested works , then there is no end to how this can be used in highly interesting scenarios and would be a massive feature/asset in context for promoting the game.
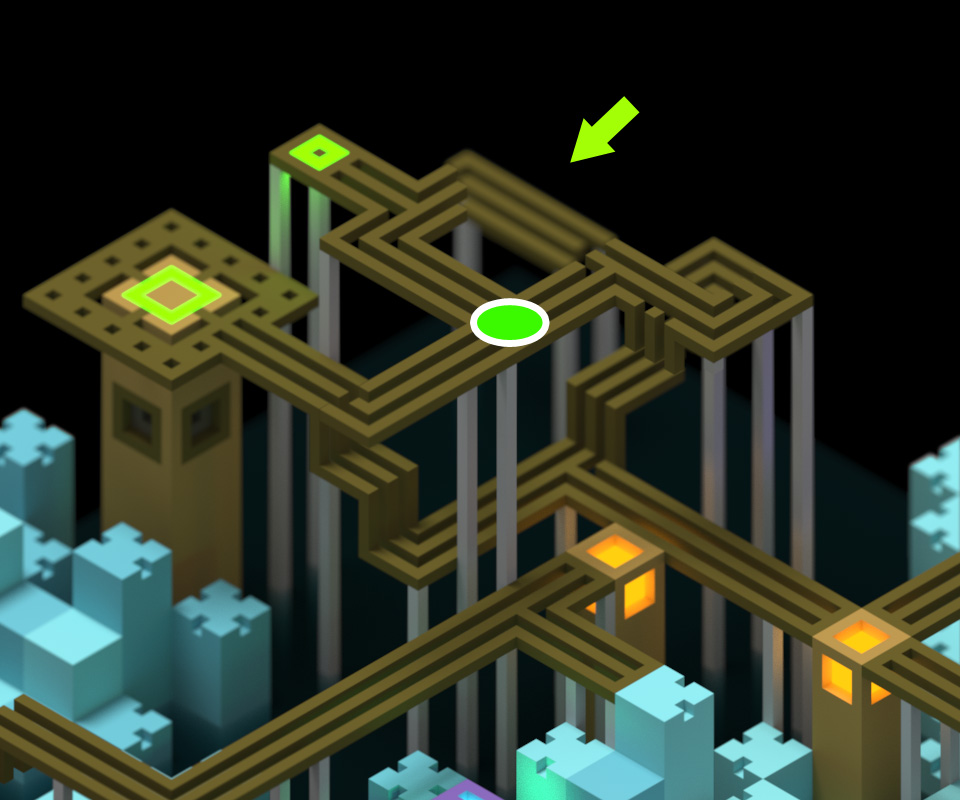 |
As an example of just one of the potential problem issues as mentioned above, here an image using DOF. It's rendered in MagicaVoxel but the same issue would apply to Unity or any other engine. The Green circle on the ground represents where the player cube might be standing, and where in this instance the camera focus point happens to be. Because of the depth of field blurring you can clearly see the piece of walkway that is in fact nowhere near the walkway (green arrow) the player can roll on. |
__________________________________________________________________________________________________
![]() Moving / Elements
Moving / Elements
|
There are 3 types of these with different functions. The reason for the 3 types is mostly in the case of the Mini-World due to issues of player progression through the world in context to the freedom the player has to do tasks in certain sequences. Because of this scenarios arise where if only using one type of Elevator the player might become trapped, or cut off from items, or other bad scenarios that end up being confusing or game breaking.
The One Way Elevator
The Two Way Elevator
There are instances of either the One or Two way Elevators having 3 positions, their starting position and their up or down position. |


|
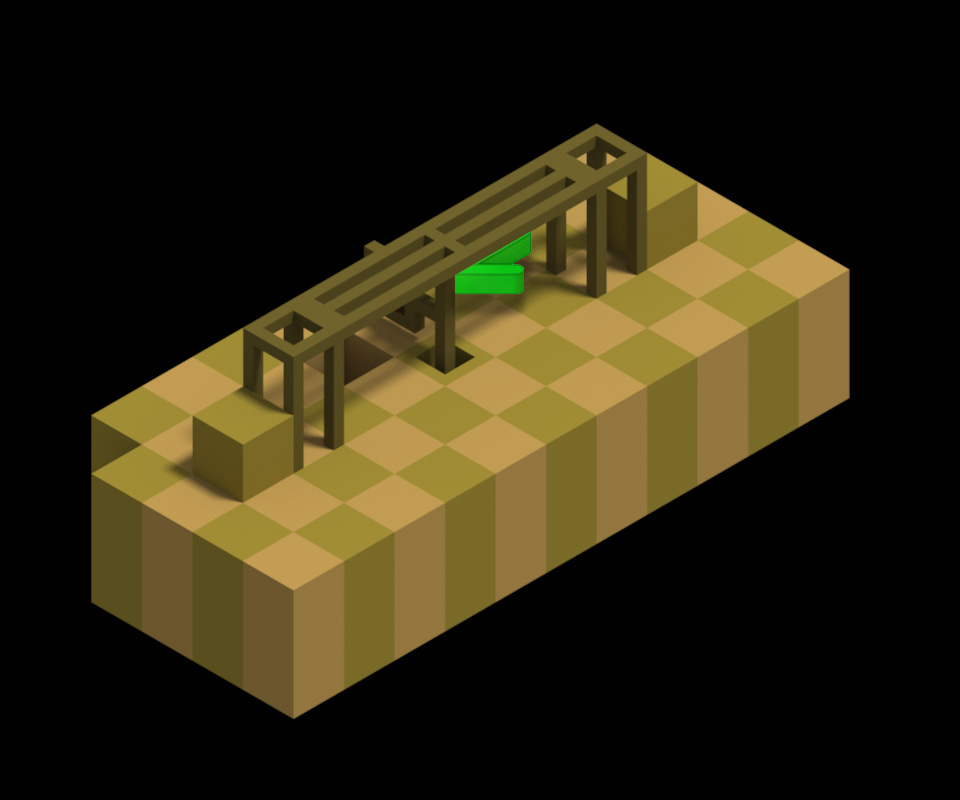
There is one instance of this in the Mini-World in it's basic form, however this type of element could be used in many ways to create intricate puzzles in areas with Swing Bridge's that have junctions off them, multi levels.. etc. There really is no end to ways these could be used to create some really interesting and challenging situations.
The Action of Pushing the Swing Bridge Switch Panel
The action of the players cube pushing against a switch panel should have a physical feel. By this I mean, the Switch panel is horizontally placed in the center of the square the player will roll into. So ideally when the players cube is at about 24 degrees rotation into this square the edge closest to the switch will make contact. At this point another animation sequence will take over for the cube and make the cubes rotation almost stop as it makes contact withe switch (near 24degree) and then slowly accelerate a "push" so the cube eventually lands face down on the square but as it was doing so always making contact with the switch panel as if it's pushing this switch physically to give the Swing Bridge enough momentum to swing around. In other words ideally this action of pushing against switches to push swing bridges around must feel like the player is doing it, rather then the feeling of the player having just pressed a switch which activates some mechanical force to push the swing bridge around.
|


____________________________________________________________________________________________________
![]() Player Progression and Game Play
Player Progression and Game Play
The Players Goal On The Mini-World
The overriding goal of the Mini-World game is to find and collect 24 Item Cubes which are glowing pink cubes scattered around the world.
Some of these cubes are straight forward to collect while others require the player to solve a puzzle element to access them, and others might be hidden from player's view and can only be found by the player's careful observation of the environment to look for clues.
Here is how these items cubes are distributed about the world.
Easy = Straight forward.
Tricky = Might be tricky to acquire.
Puzzle = Requires a puzzle element to be solved to get access to.
Hidden = Hidden from players view and using hints/clues to help the player find.
| Section 1 - 1 Tricky |
Section 2 - 1 Easy |
Section 3 - 1 Easy - 3 Puzzle |
| Section 4 - 1 Tricky |
Section 5 - 1 Easy |
Section 6 - 3 Easy - 1 Puzzle+Hidden - 1 Hidden |
| Section 7 - 1 Tricky - 2 Puzzle |
Section 8 - 2 Easy |
Section 9 - 1 Easy - 2 Puzzle - 3 Hidden |
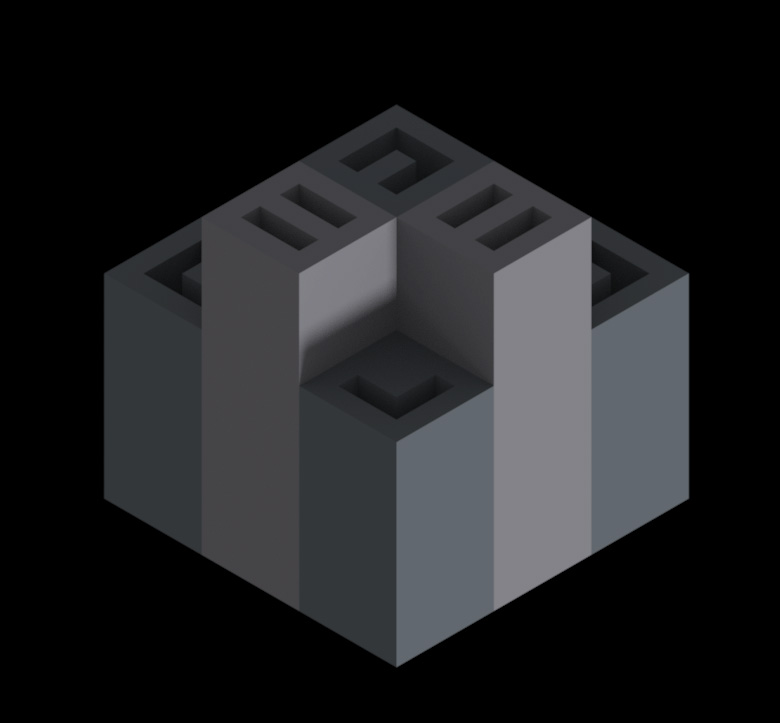
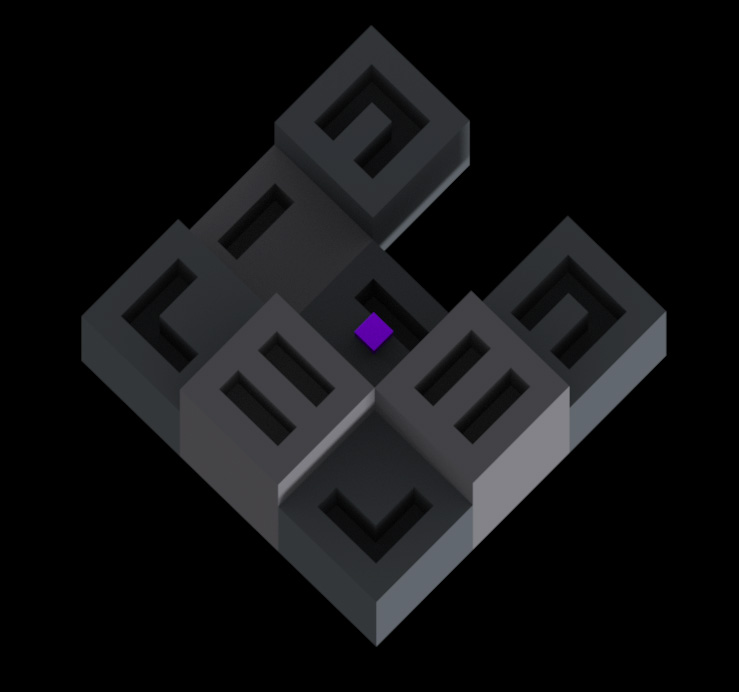
Item Cube Totem / Floor Displays.
Because many of the Item Cubes in the game would likely be hidden from the players immediate view, there has to be a system letting the player know how many Item Cubes are left to find in a certain area/zone of the game world. This is to avoid situations such as the player not finding one cube in a particular area and having no indication where it "might" be, so the player is faced with the situation of having to explore many many areas they may have already been assuming there might be a cube hidden in any one of these areas.
To help avoid these situation there will be Totem / Floor displays at the entrance or near zones/areas where there are multiple cubes to find.
Before entering an area with multiple cubes to find the player should encounter one of these things. If the area ahead had for example 8 Item Cubes to find, then this display will show 8 filled slots to indicated to the player there are 8 Items ahead and some of them may or may not be hidden from view.
As the player collects each Item a light will go out on these totem/floor displays, so the player will always know how many they have collected in this area and more importantly how many are left to find.
The reasons for the 2 types is in some areas of the world it might be more suitable to have the Totem style while in other areas the Floor display might suit better. Some of the Floor displays might be smaller such as 4 Item Cube indicator displays.
 |
| IMORTANT NOTE: The Totem / Floor Display's as demonstrated in the above image have not been included in the images of the Mini-World. When the Mini-World is under development I will figure out the best locations for these elements. |
____________________________________________________________________________________________________
![]() Section By Section Breakdown On Mini-World's Functionality and Player Progression
Section By Section Breakdown On Mini-World's Functionality and Player Progression
As is by now clear, I have created the world in sections, however I have tried to avoid the world ending up where details are packed into specific sections. I have instead thought of the 9 sections as one so tried to overlap features on one section into another section, in other words I wanted to try make these sections seamless when put together and not obvious they are build in sections. The next few parts of this document will outline how each section on an individual basis works however as mentioned there will be many instances of a function of one section having direct relevance to an adjacent section so I will try my best to explain things in this context.
To be honest working in sections has been a challenge and I honestly would not create these sections if MagicaVoxel had bigger canvasses than 126x126x126 instead I would just build the world as a whole. Anyway, here we go...
Sections will be covered in an order that I created them and from a players point of view in order of my personal player progression.
 |
I will be explaining them in this order, however it is important to note that the player has a degree of freedom to the order in which they will do things so they may very well do things in a different way to how I am explaining.
| The first 3 sections I will be quite descriptive with how the player progresses as well as the functionality, this is to demonstrate the gameplay aspect of how a player might be thinking. However I will only go into this sort of detail on the first 3 sections the rest will be very very short descriptions of progression. Unless something specific needs explaining only then will I go into more detail. |
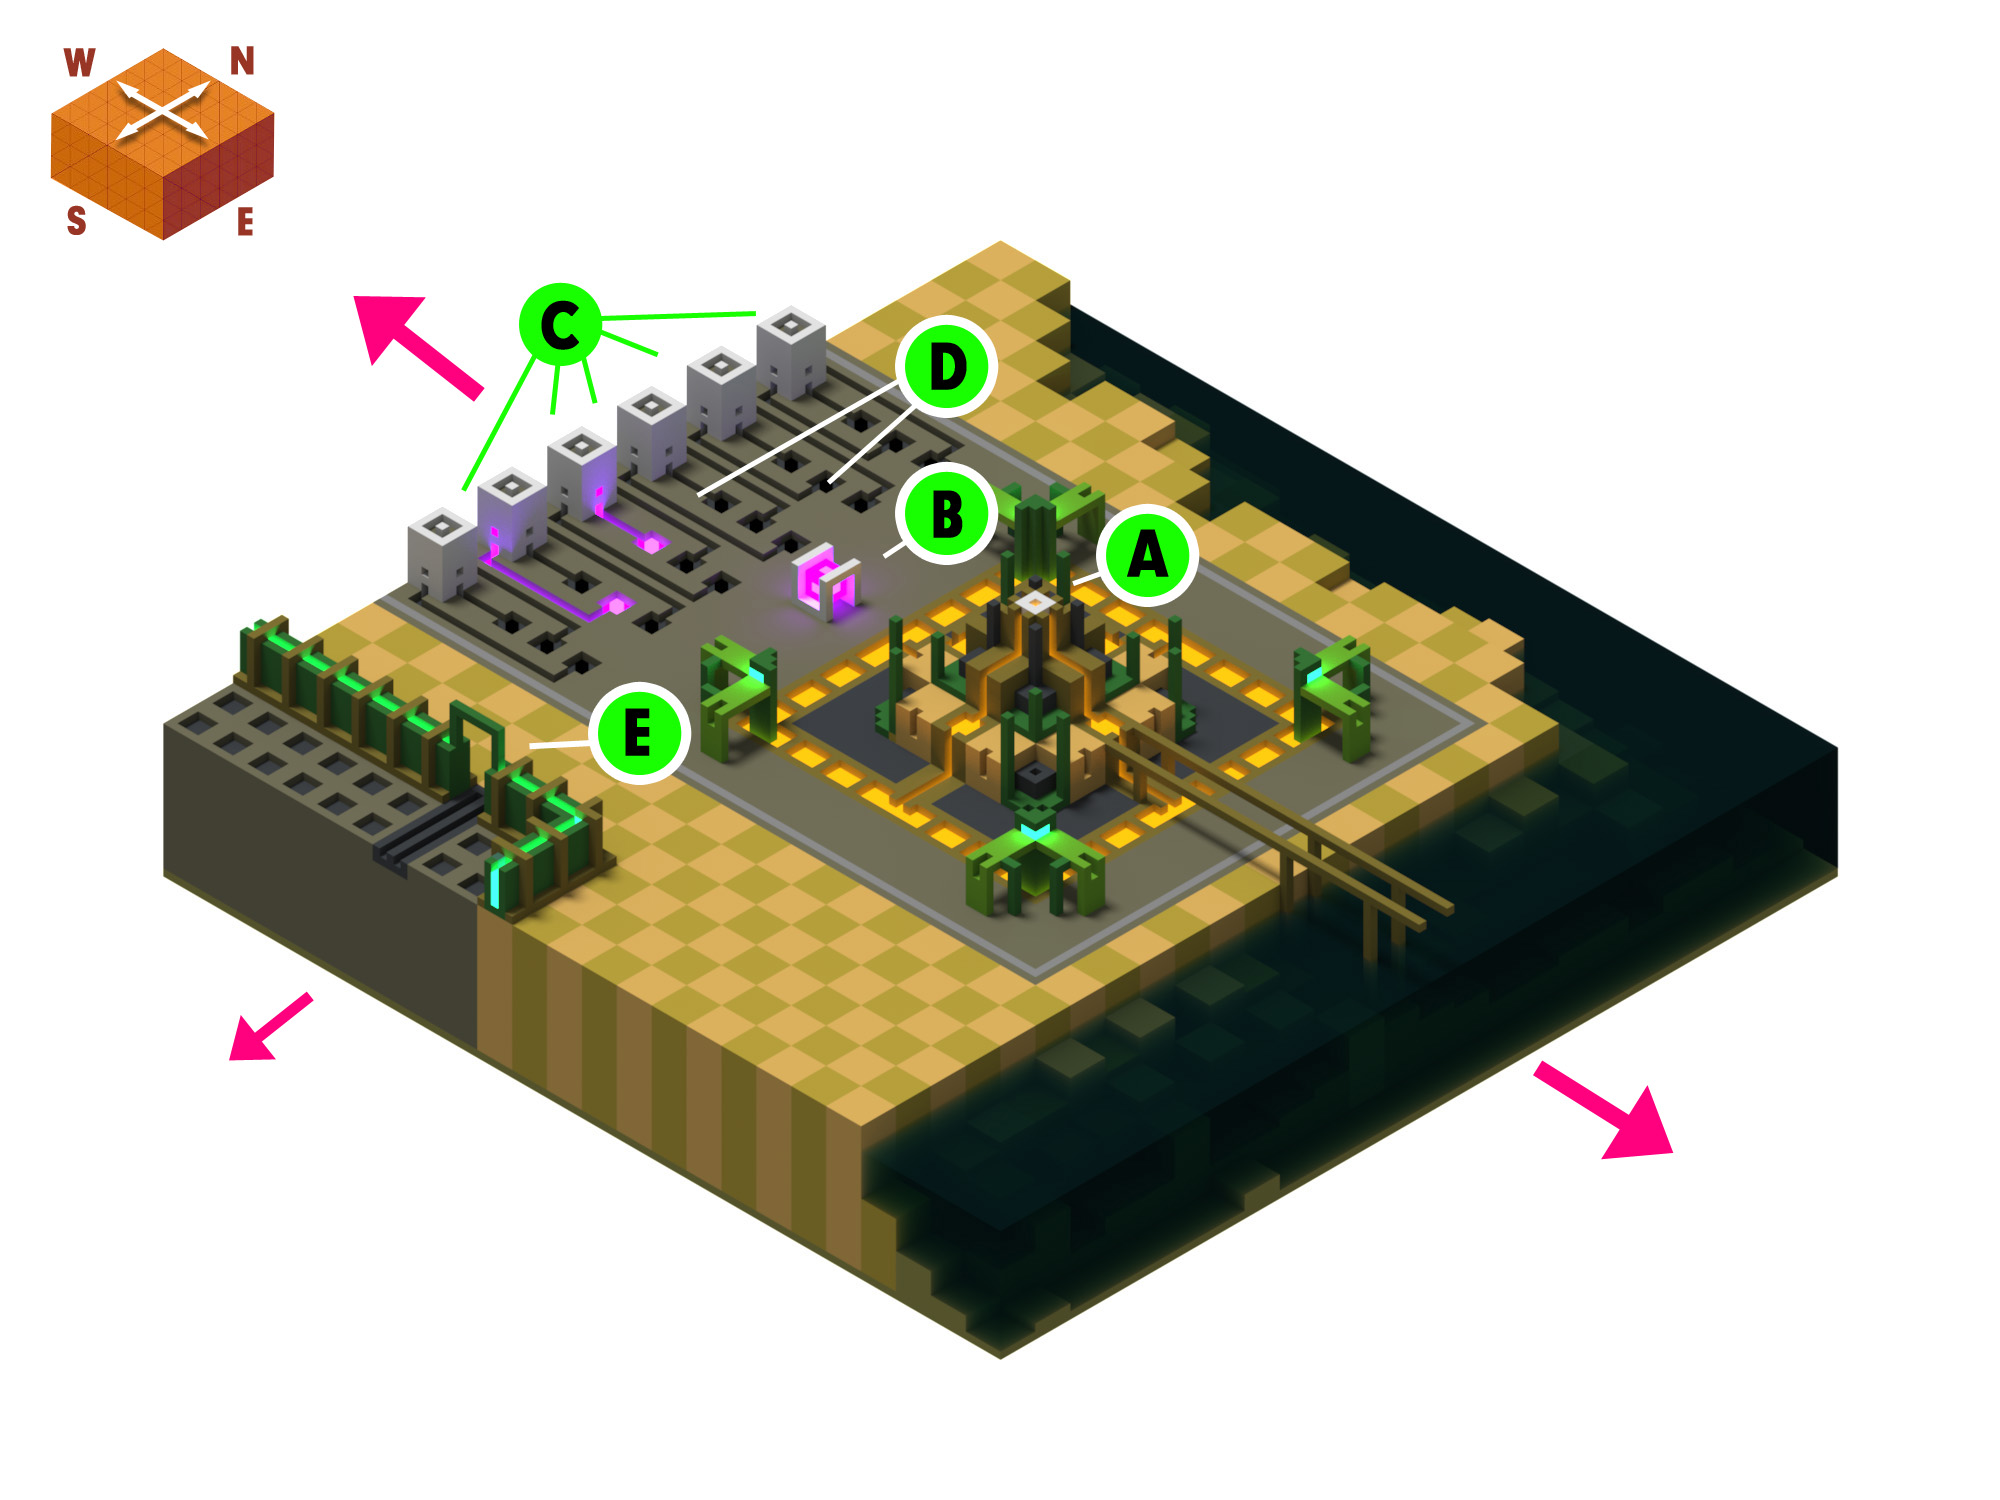
Section 5 is the center section and where the player will start their mini adventure. From this section the player will have their first interaction with an NPC, and that NPC will explain there are 24 lost Item Cubes scattered about the world. This NPC gives you the task of venturing out to the world to find, collect and deposit them into the Hub Pillars, these Pillars are the 6 white blocks where the player deposits their collected items.
|
|

|
See you there....
|

|
Player eventually ends up at a junction
So assuming the player manages to solve the color puzzle and grab the Item Cube while not making contact with the Angry Triplets the passage through to section 4 opens
|

|
Player activates spawn point See you there....
|

|
Player controls the water crossing cart to cross river
After arriving back into section 4 the player can switch the switch to open the door (Sec 4 = G) to section 5 . While back in section 5 they deposit their Item Cubes and save any progress.
Player decides to see what the NPC in section 1 (Sec1 = O) has to to say, the only way in there is through a doorway to the SOUTH on section 5 (Sec 5 = E) They enter back into section 1 and talk to the NPC (Sec 1 = O) who tells them a hint that will lead the player under ground and out on to section 4 (Sec 4 = K) then into a structure that brings us back into section 7 At this point will have to get back on to that high walkway that comes back out at
They head back onto the high walkway via section 2 to end up in section 1 taking the SOUTH route at the junction (Sec 1 = A) leading them into section 4 over the filled gap in the walkway (Sec 4 = D) and over the water......and we are back in section 7 again. Player activates the spawn point If you can remember back in the chapter on section 8 the player has already solved the puzzle that bridged the gap in the walkway so they can enter into section 9. See you there....
|

|
Player enters from the SOUTH
At this point the player may have very well seen that there are more Item Cubes just ahead in section 6 but realize their inventory is also full. They head back to the Elevator
|

|
Player exits from to doorway Player heads back into section 9 uses swing bridge to get back into section 6 and through the structure and out. When they step onto the Elevator Player heads back out the doorway and steps on Elevator
So the player makes their way over the winding walkway and heads WEST into section 3 See you there...
|

|
So we are nearing the end of our little mini adventure. Player sees there is no way to collect the Item Cubes Player rolls on to Elevator
Player sees 3 cubes to be collected up and onto the elevated walkway, then SOUTH to collect the Item Cube So player heads down and around and into section 2 where they they figure out how to get back to section 5 to deposit their 6 cubes into the HUB.
ENDING SQUENCE... GAME OVER |

| A REMINDER...... That this sequence of progression I have chosen to demonstrate could be done in many different ways and in that context I have tried to think of scenarios where the player explores this Mini-World in a different order while building the world, but only game testing preferably by other people will root out any situation where the player gets trapped, or end up with Item Cubes that are inaccessible, or Elevators being in the wrong position when approached from a certain way because of a certain sequence a player did in progressing through their adventure. Another Important Note/Reminder is this Mini-World is a compact , small scale version of the game proper. The game proper will most likely not be as packed with puzzle areas and feature more open areas just for exploration. |
Please don't hesitate to contact me for any inquiries or interest in getting involved
cube@fractalscapes.net
____________________________________________________________________________________________________
For further reference here is an index of links to areas on this page.
Introduction
01. The Purpose of this Mini-World Prototype
02. The Purpose of this Document.
03. The Preliminary Documents
04. Terminology To Avoid Confusion
05. How The Mini-World Works In Comparison to the Original Design Document
Rules, Mechanics and Functionality
06. The Global Rules To The Mini-World
07. The Hints Design
08. Re-spawning
09. NPC & Player Dialog , Reactive Animations & Audio Speech
10.
The Optical Illusion Factor
Moving / Elements
11. Elevator Blocks
12. Moving Elements using the Controller Switch Squares
13. Swing Bridges
Player Progression and Game Play
14. The Players Goal On The Mini-World
15. Section By Section Breakdown On Mini-World's Functionality and Player Progression
Section Chapters
| Section 1 Explanation Chapter |
Section 2 Explanation Chapter |
Section 3 Explanation Chapter |
| Section 4 Explanation Chapter |
Section 5 Explanation Chapter |
Section 6 Explanation Chapter |
| Section 7 Explanation Chapter |
Section 8 Explanation Chapter |
Section 9 Explanation Chapter |